Making and Canning Your Own Chunky Garden Salsa
 Jump to Recipe
It’s no coincidence that some of the most popular vegetables to grow in a home garden also happen to be the main ingredients of delicious salsa. Many backyard gardeners have this very thing in mind when they plant their tomatoes, peppers, and onions in spring. Who can resist the allure of beautiful, fresh salsa with crispy tortilla chips?
This article is for beginners who have never made fresh salsa before, but it’s also for people who are no strangers to salsa-making but have never canned it. Those fresh veggies only last so long after harvest, and freezing salsa isn’t ideal due to its affect on texture and consistency. So why not preserve all that tangy goodness in jars and have plenty of garden-fresh salsa to munch on all year!
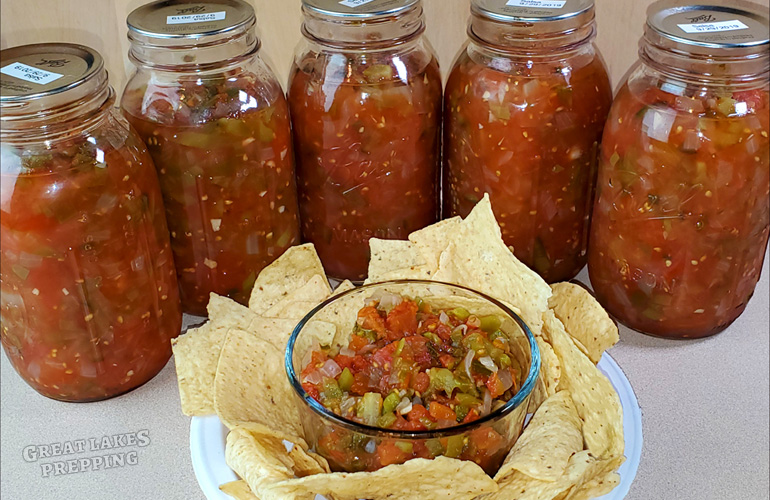
This will be broken down into two main parts: Making your salsa, and canning your salsa. This recipe makes about 6 quarts, which means you can can use 6 quart-size jars or 12 pint-size jars. I prefer quart-size, because I can do the whole batch at once in the hot water bath canner. And let’s not kid ourselves that any salsa will go to waste after popping open a quart jar. I can kill a quart of salsa in a weekend!
Making the Salsa
My favorite store-bought salsa is Pace Picante. I have a low tolerance for spiciness, so I opt for the “mild” variety. It’s a nice, medium-chunky salsa with just the right acidic bite to it that I love. I have based my recipe on the texture and general flavor profile of Pace Picante (mild). They taste very similar, in my opinion.
If you don’t grow your own vegetables, that’s perfectly fine. Just hit up a farmer’s market or grocery store and buy what you need.
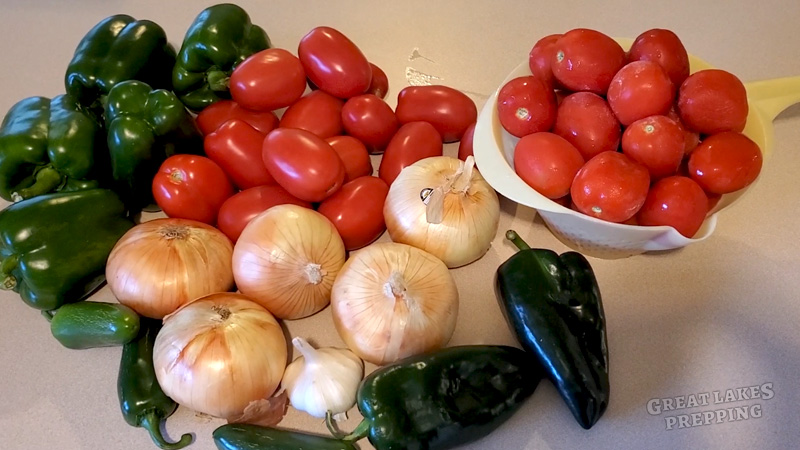
Salsa Ingredients
- 20-25 Roma tomatoes
- 3-4 large Spanish onions (regular yellow or white onions work too)
- 3-4 green peppers
- 2 poblano peppers
- 3 jalapeño peppers
- 4-5 cloves of garlic
- 2-3 tablespoons fresh cilantro
- 1 cup white vinegar
- 2 tablespoons salt
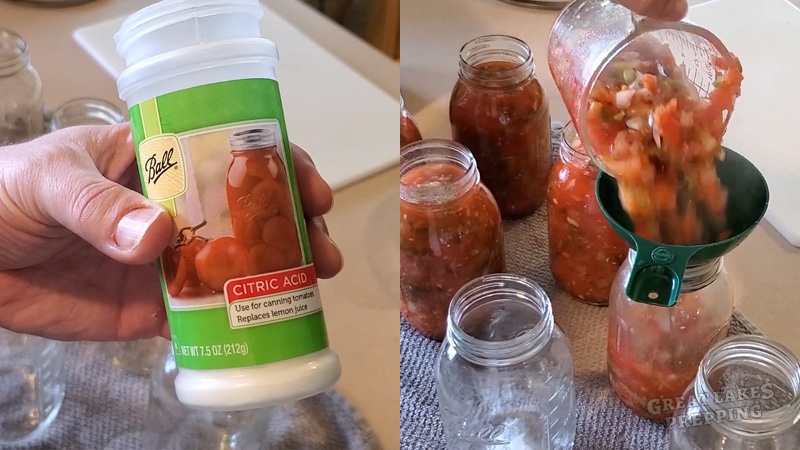
- Citric acid (for the canning process)
As I mentioned above, I can’t do very spicy foods. If you like your salsa to have some heat, substitute the poblano peppers for more jalapeno, habenero, serrano, or whatever hot pepper you like. If you’ve never made salsa with your hot peppers before, proceed with caution. You may end up adding way too much. For your first batch, I would err on the side of “less heat” just so you can get a baseline of how spicy your peppers of choice will make this dish.
Directions
Making the salsa is a straightforward process that mostly involves chopping the vegetables and cooking them awhile.
Peeling the Tomatoes by Blanching
The first step is to blanch the tomatoes so you can easily remove the skin. Blanching involves placing the tomatoes in boiling water for just a few minutes, then plunging them into ice water. To get started, cut a tiny bit off both ends of each tomato.
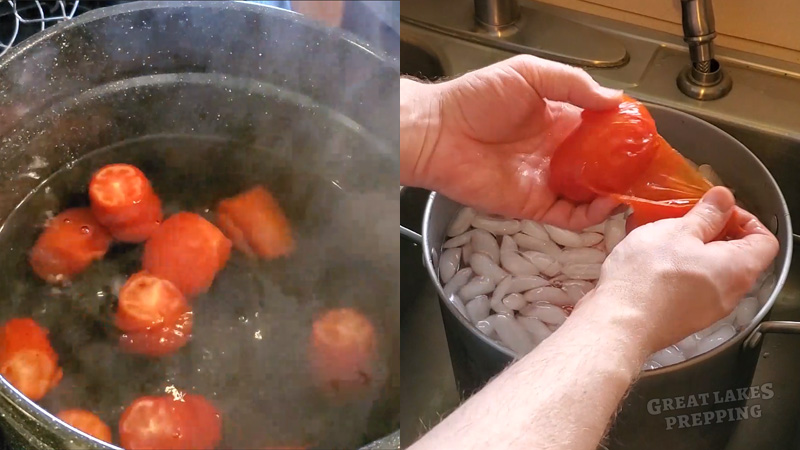
Get a large stock pot of water boiling, and carefully add your Roma tomatoes. Let them boil for about 5 full minutes. While the water is heating, fill up another large pot, bowl, or sink with ice and cold water. After the tomatoes have boiled for 5 minutes, use a slotted spoon to carefully remove each one and set them in the ice water. After a couple minutes, the skins will peel and slip right off the rest of the tomato.
Pour all the hot water out of your large pot. This will be the same pot you cook your salsa in.
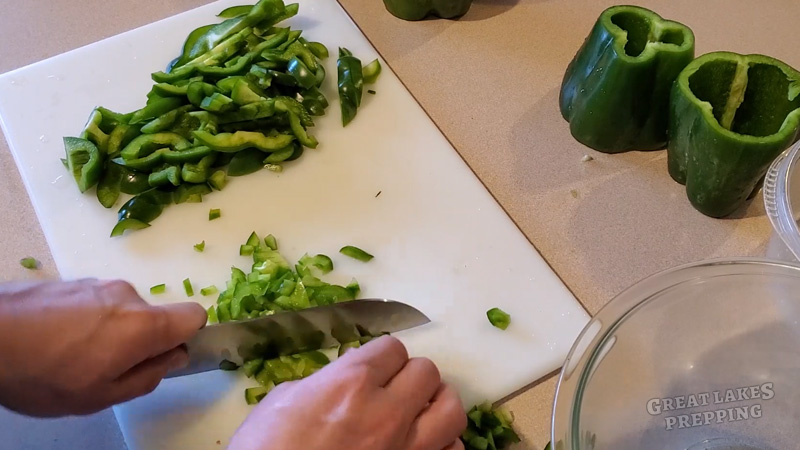
Chop All the Vegetables
Since your tomatoes are all nice and peeled, just give them a rough chop on a cutting board. They will break down a lot while cooking, so you don’t need to try and mince or finely chop them. Just give each tomato a few whacks in both directions with your chef knife. Toss your chopped tomatoes into the stock pot and rinse off your cutting board.
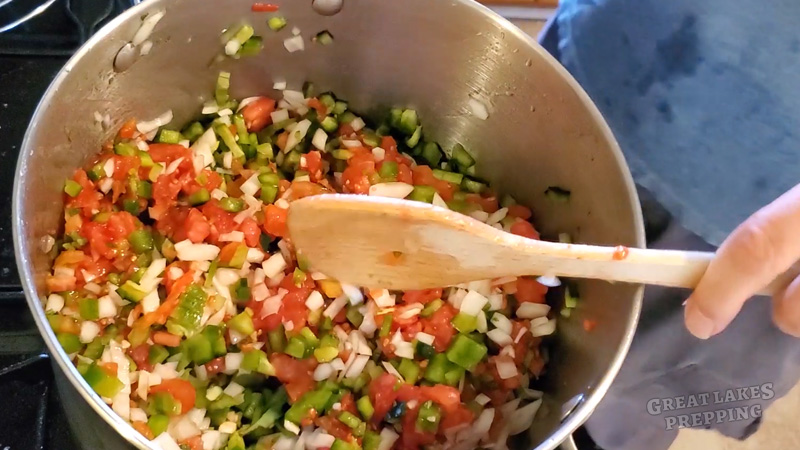
Now chop all of the onions and peppers. I like a nice medium-chunky salsa, so I try and be careful not to chop too big or too small. Just a good, middle-of-the-road chop! And be sure to wear gloves while chopping those peppers, especially if you have swapped out the poblano for something hotter! Toss everything into the pot.
Finely chop the garlic, and enough cilantro for 2-3 tablespoons. You can either add the garlic and cilantro to the pot now, or wait until it’s halfway cooked. This is a matter of preference, as some people would say the flavor is better if you don’t cook garlic and cilantro as long as the other ingredients. Personally, I just throw it all in from the beginning.
Cook the Salsa
Get your big pot of veggies on the stove and turn the heat to medium-high. Give everything a really thorough stir with a big wooden spoon (or similar utensil). Make sure to incorporate all those ingredients really well as it begins to cook.
As it starts to heat up, add your cup of white vinegar and salt. Stir some more.
Once everything gets to a light boil, reduce the heat to simmer. Let the salsa simmer for 20-30 minutes, stirring often.
After simmering, the salsa is done! If you like, you can scoop some out to put in a separate container to refrigerate and enjoy tonight. I usually can’t help myself, and at least one quart never makes it to the hot water canner. As soon as you let that stuff cool, it’s tortilla-time!
Quick note about texture: I prefer a somewhat-chunky salsa, but I have been asked about turning it into a thinner consistency. The easiest way is to (carefully) use an immersion blender while the salsa is cooking. Let it simmer until the vegetables are pretty soft, and then use the immersion blender to grind everything all up until it’s at the level of chunkiness (or non-chunkiness) you prefer. I recommend being careful not to over-blend it, because you don’t want to dip tortilla chips into a bowl of V8 juice!
Canning the Salsa
If you’ve never used a hot water bath canner to preserve food in mason jars, it’s a rather straightforward process. The concept is very simple, but there are a few steps you must follow. For the sake of food safety, don’t skip any steps. Botulism is nothing to screw around with, and it can make you die. But just follow these easy steps, one by one, and there is nothing to worry about.
There are a few pieces of equipment you will need for hot water bath canning.
- Mason jars with matching metal lids and rings/bands
- The canner (large metal pot with lid and wire rack)
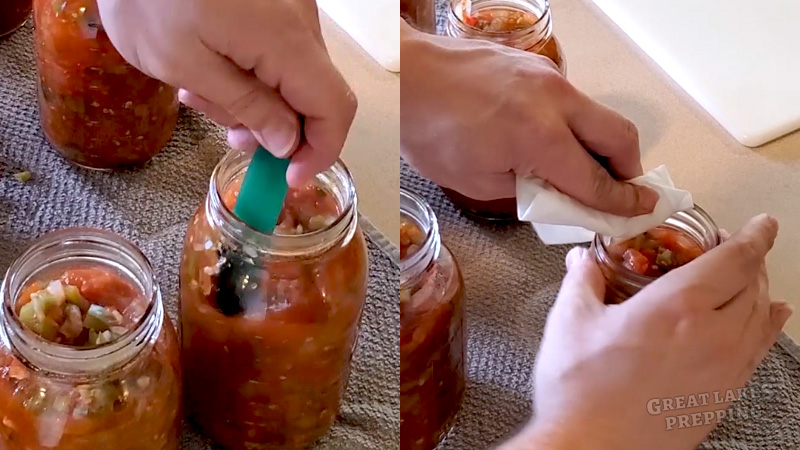
- Mason jar funnel
- Jar lifter tool
- Magnetic lid lifter
- Bubble-popper tool
There are many kits available that include a bunch of these materials into one handy set.
Sterilizing the Jars and Lids
If you are reusing old jars, make sure they are completely scrubbed clean of old food bits, residue, or oils. If using brand new jars, they just need to be sterilized.
There are two simple ways to sterilize the jars: Boil them or steam them. If boiling, just fill your canner pot with water and boil the jars. Always ensuring the metal rack is in place, set your jars upside down on the rack and let them boil for a few minutes. If steaming, do the exact same thing but only fill the canner pot with a few inches of water. Placing the jars upside down on the metal rack will allow the steam to get in each one. With steaming, be sure to let them sit there for 10 minutes or more after the water has begun rapidly boiling.
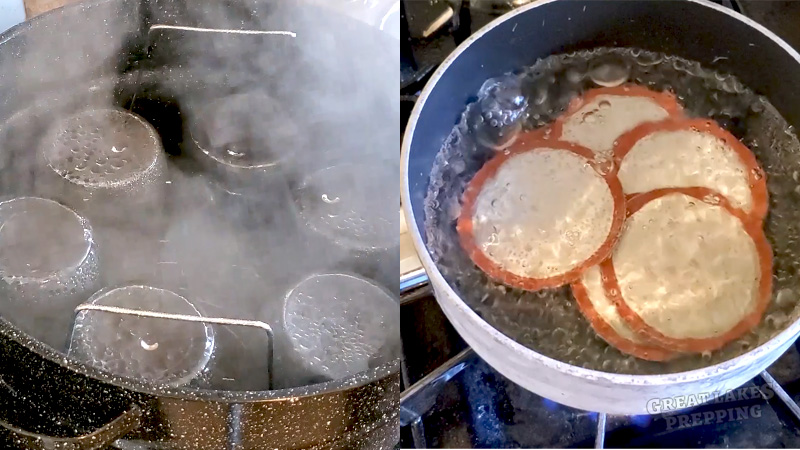
After they are sterilized, careful remove the jars from the canner with your lid lifter and set them, right-side up, on a towel on your counter. Let them cool for a few minutes before attempting to handle.
While the jars are cooling, get a small sauce pan full of water boiling. You only need enough boiling water to fully cover your lids. Boil the lids (not the rings, just the lids) for a couple minutes, and turn the heat off. Leave your lids in the water until it’s time to use them.
Filling the Jars
Hot water bath canning can be used for foods that are high in acid, such as tomatoes. A different process must be used for low-acid vegetables, meats, and pretty much everything else. Since salsa is quite acidic from the tomatoes and vinegar, it’s perfect for hot water canning. But just to be extra safe, it’s recommended to increase the acidity just a little bit more. That’s where the citric acid powder comes in. Before you begin filling your jars with salsa, just drop in 1/4 of a teaspoon of citric acid into each quart jar (1/8 teaspoon per jar for pints). And that’s it!
Using your jar funnel, scoop salsa out of your stock pot with a measuring cup or ladle. Carefully fill each jar, leaving about an inch of headspace. A quick way to measure this is to just fill the jars up until it reaches the bottom edge of your funnel. If the salsa starts to flow up into the bottom of the funnel, it’s probably a little too full. If you have a little more than 1 inch of headspace, that is fine. But you don’t want to over-fill.
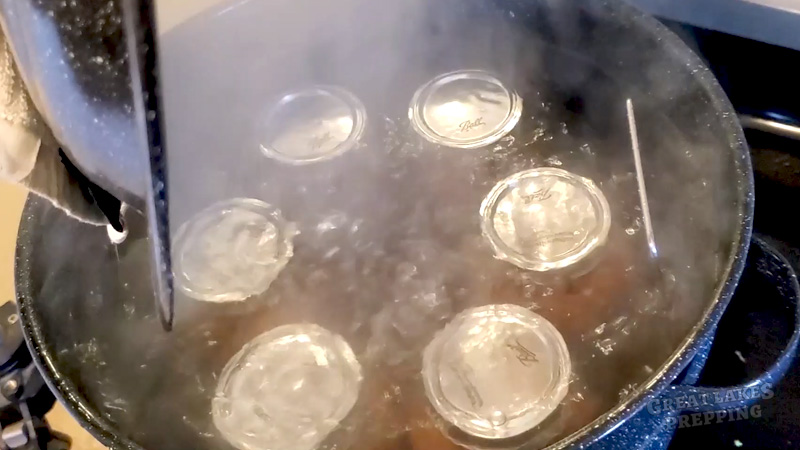
After the jars are filled, use the plastic bubble-popper tool and work it around the inside walls of each jar. Make sure you lightly scrape every inch of those inner walls. What you’re doing here is popping any air bubbles that may have formed in the salsa during cooking or filling jars. Oxygen is the enemy of food preservation, especially in a wet environment like a sealed jar of liquid. Taking care to pop any bubbles will help to ensure that there is no oxygen, and therefore no harmful bacteria, in your finished product.
Next, use a moistened paper towel and carefully wipe the top rim of each jar. Go over each rim a couple times, and be sure to really wipe it well. If there is any food residue on that rim, it can cause the seal between the jar and lid to fail.
Using your magnetic lid lifter tool, take your lids out of the water and place them atop each jar. Take care not to touch the bottoms of the lids with your fingers.
Now just screw the rings onto each jar. Don’t over-tighten them. Just put them on finger-tight.
Processing the Jars
Processing is what it’s called when the “canning” process is taking place. This is heating the jars in boiling water, which sterilizes the contents while sealing the jar.
Place your jars, right-side up, on the metal rack inside the canning pot. Using a pitcher or the hose from your sink, fill the canning pot with water until it completely covers all of the jars. Ideally, the water level should be about an inch higher than your jars. It’s also recommended that you do your best to keep the jars from touching one another. This can be tricky, since there isn’t much room to spare inside the canner when full of jars. Just do your best, but don’t get stressed out about this step.
Place the lid on the canner and turn the heat up to high. “Processing” begins when the water reaches a full boil. The processing time for salsa is 20 minutes for quarts, and 15 minutes for pints. This means that once the water reaches a rolling boil, you can start your timer.
After the processing time is finished, turn off the heat. Very carefully remove your jars with the jar lifter tool and them them on a towel on your counter. After a few minutes, you will start to hear the lids “pop”. Actually, this sound is the jars un-popping. The lid will suck inward just slightly, making a pop sound. This happens as everything begins to cool. It’s a telltale sign that the jars are sealed, and the canning process was a success!
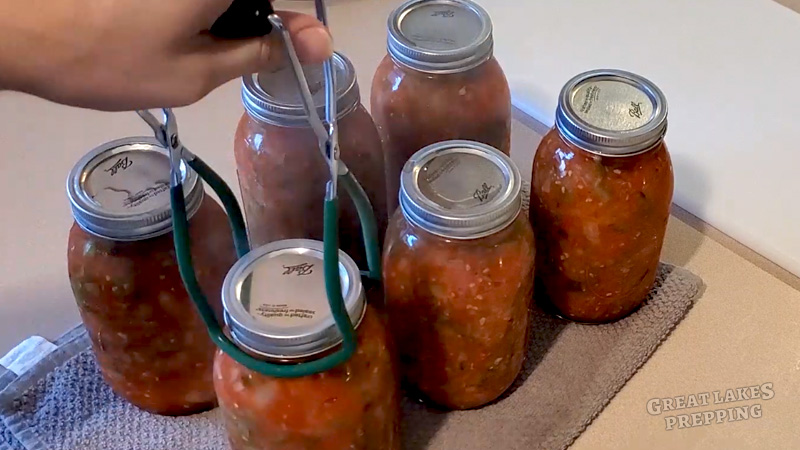
Leave the jars undisturbed for many hours, until the jars and their contents are completely cooled to room temperature. If, after this time, any of the jars did not un-pop, it means that a proper seal did not form. Inspect your jars and make sure that you can’t press the lid inward with your finger (thereby forcing it to “un-pop”). If any of your jars did not fully seal, that’s ok. You can still put that jar in the fridge and use it within the next few weeks. It just means that the jar will not be “shelf-stable,” and you can’t store it without refrigeration. This happens to everybody once in awhile, so don’t get too bummed out if it happens. Practice makes perfect!
Some Final Points
Broken Jars
Another thing that happens to everyone at least once is that a jar breaks while processing. Maybe you started heating the water too much before placing the jars in the canner. Maybe the jar had a hairline crack that you couldn’t see. Maybe a million things. But everybody who has some experience canning has opened up their canner after processing to find a broken jar and a big mess of simmering liquid. There’s nothing you can do at this point. You can’t salvage your food from the broken jar. All you can do is pull your other jars out, let them cool, and then thoroughly wipe them clean (since they were essentially soaking in a hot-salsa canning bath!)
I had a jar of pickles break in the canner last year. My precious, home-grown cucumbers and spices… wasted! I wish I could fish the pickles out of the water bath and save them. But there’s broken glass in that water, and there’s no way to be certain that none of it will be on my food.
Storage
When sealed properly, your salsa will be fine on the shelf for several months. A common rule of thumb says that it will be perfectly safe to eat for between 6-12 months, if stored in a cool place out of direct light. Personally, I’ve never had a jar that didn’t get eaten well before that 12 month mark.
Also, make sure to store the jars without the metal rings on. After those jars fully cool, just remove the rings and don’t put them back on. The lid will stay in place just fine. Leaving the rings on can cause rust to form between the ring and lid, sometimes causing the seal to break and ruining your food.
As with all canned goods, just make sure to give everything a quick inspection before you eat. Is the jar or lid damaged? Is it rusty? Did the seal somehow get broken? Does the food look murky or nasty? After opening, do you observe any strange smells? Is there any foamy gunk floating at the top? Use your best judgement. As long as you processed it correctly, the seal is fine, and you eat it within a certain time, you’re not likely to experience any problems. In all the years I’ve been canning foods, I’ve never had an issue as long as I follow all the steps.
Disclaimer: While canning salsa in quart jars is common and done safely and successfully by many people, there is no “official” recommendation for canning salsa in quarts. Due to its density and the ratio of low-acid ingredients (onion, peppers), the only “official” recommendation for canning salsa is in pint jars or smaller. As with all home canning, do so at your own risk, and inspect everything before eating.
For “approved” salsa recipes from the National Center for Home Food Preservation, visit this link.

Chunky Garden Salsa for Canning (Mild)
Course: AppetizersCuisine: MexicanDifficulty: Moderate6
Quarts1
hour20
minutesIngredients
20-25 Roma tomatoes, blanched, peeled, and loosely chopped
3-4 large Spanish onions, chopped
3-4 large green peppers, chopped
2 poblano peppers, chopped
3 jalapeño peppers, chopped
4-5 cloves garlic, finely chopped
2-3 tablespoons fresh cilantro, finely chopped
1 cup white vinegar
2 tablespoons salt
1.5 teaspoons citric acid
Directions
- Combine all ingredients except citric acid in large stock pot. Heat to boiling, then reduce to simmer for 20-30 minutes.
- Sterilize 6 quart jars or 12 pint jars. Sterilize lids.
- Put 1/4 teaspoon of citric acid into each jar for quarts, or 1/8 teaspoon for pints.
- Fill jars with salsa, leaving 1 inch headspace. De-bubble jars and wipe rims with damp paper towel.
- Place jars into canner and fill with enough water to cover jars completely.
- Heat water to full boil and then set timer for 20 minutes for quarts, or 15 minutes for pints. This is the processing step.
- After processing is finished, turn off heat and carefully remove jars from canner. Set on counter and leave undisturbed for 12-24 hours. The lid on each jar should “pop”, which means the seal is good and canning was successful. If any jars don’t pop, the seal isn’t good and jar will not be shelf stable. Put any unsealed jars in fridge and use within 2 weeks.
- Remove metal rings and store sealed jars in a cool place away from direct light. Use within 1 year. Refrigerate and use within 2 weeks after opening.
Notes
- Disclaimer: While canning salsa in quart jars is common and done safely and successfully by many people, there is no “official” recommendation for canning salsa in quarts. Due to its density and the ratio of low-acid ingredients (onion, peppers), the only “official” recommendation for canning salsa is in pint jars or smaller. As with all home canning, do so at your own risk, and inspect everything before eating.
For “approved” salsa recipes from the National Center for Home Food Preservation, visit this link.