How to Build a Firewood Shed for 3-4 Face Cords
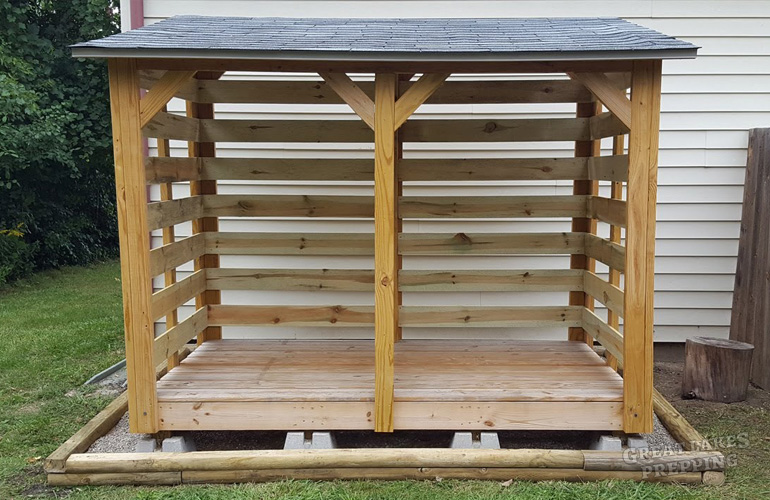
Last year I decided that I wanted to store some of my firewood closer to the house, for easier access during the coldest days. I wanted a storage solution that would hold at least a full cord of wood (which is basically equivalent to 3 “face” cords). I had the perfect spot behind the garage to construct a roughly 8-foot by 4-foot firewood shed. As with many things, I made it more elaborately than I probably needed to.
For permitting and assessment reasons, I didn’t want to construct something that would be considered a “permanent structure,” which is why I didn’t dig holes and cement the posts in place. While practically-speaking this thing isn’t exactly portable, but officially-speaking, this firewood shed is considered “moveable”.
I looked at a lot of firewood sheds online to get ideas for how I wanted to build mine. I took bits from different ideas here and there, and more or less designed my own version. I don’t know much about 3D prototyping software, so I tend to plan out a lot of my projects in 2D, from multiple angles. This allows me to get exact measurements and also know exactly how much materials I need to get.
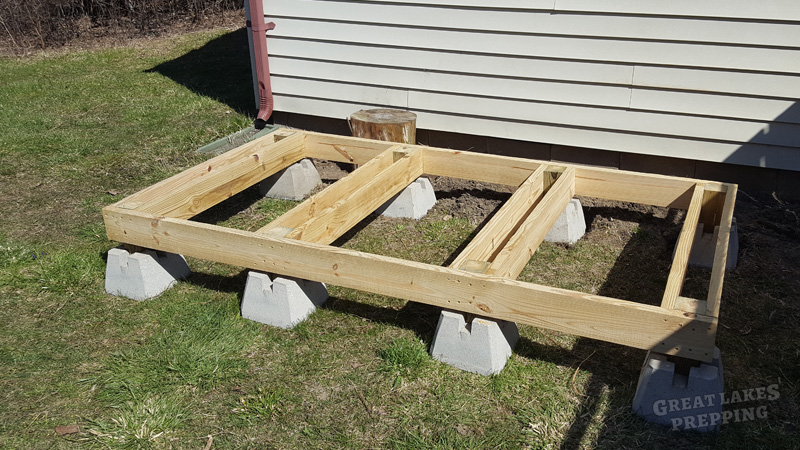
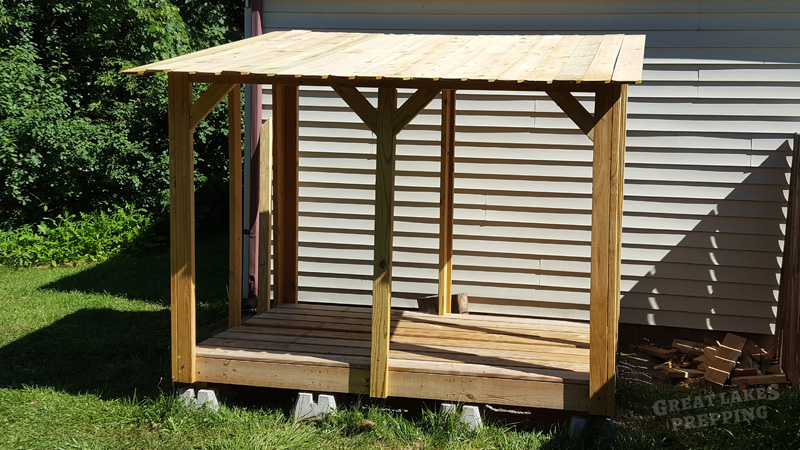
So I started out by building the floor beams and posts atop these concrete footings. This ground is somewhat slanted and uneven, so most of the posts are slightly different heights to ensure the shed would be level on all sides. Proper construction practices would have me space the beams closer together, but being that they are all essentially doubled-up, this thing is incredibly strong and sturdy.
Then I added the floorboards. I used regular pine decking, and left a gap of a couples inches between each board, to allow for some airflow around my firewood.
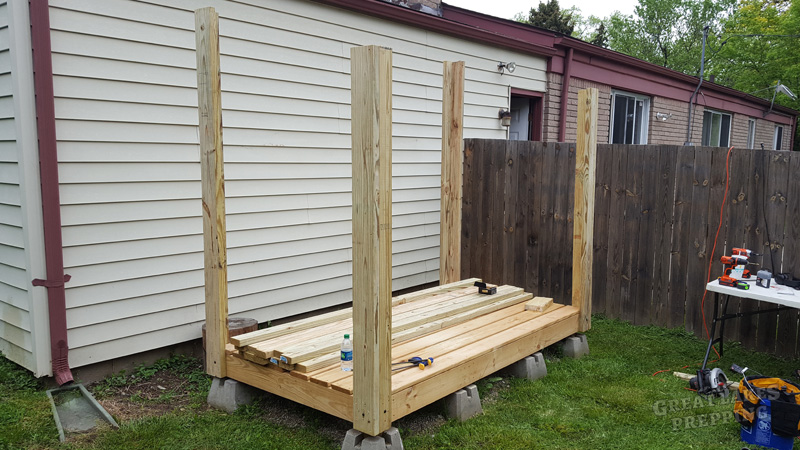
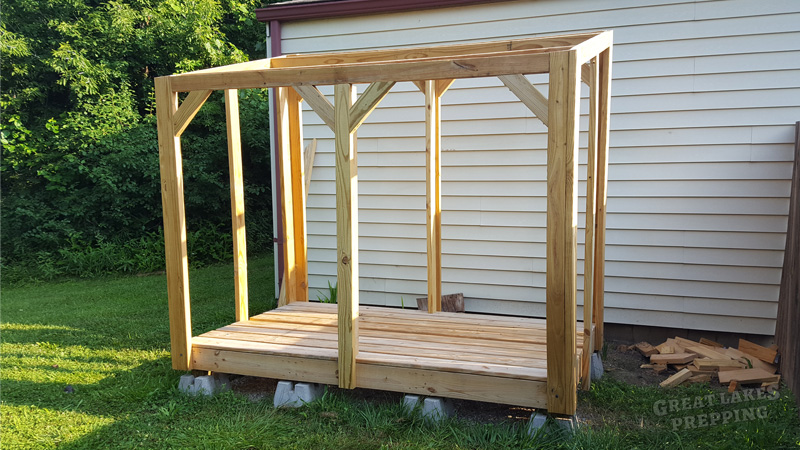
Next was the vertical supports. I made each of the 4 corner supports by making an “L” out of two 2×6 boards. Then I cut the tops at an angle, and connected them all at the top with horizontal 2×4’s. A couple more 2×4’s added in, and the framing for the roof is complete. Then I added center vertical supports to the front and back, and used diagonal 2×4 braces between each vertical support and the roof frame. Besides adding structural support and rigidity, I think the diagonal supports look really nice.
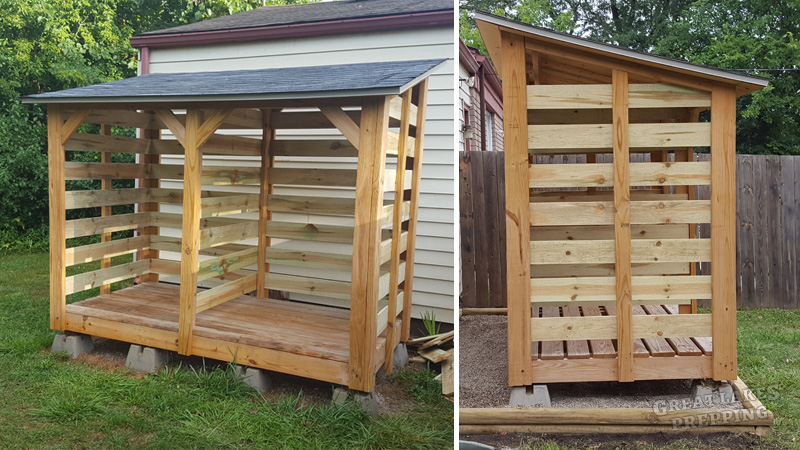
Because the outer dimensions of this thing were slightly more than 8×4, I would have needed to buy two sheets of plywood for the roof – though I would only need a little bit of one of those sheets. So I decided to make the roof surface out of planks instead. I ended up using 6-foot long wooden fence pickets since they’re thinner, lighter, and cheaper than using decking. Since the roof will not need to support any weight except for itself and maybe some snow in the winter, these pickets were plenty strong enough. After attaching all the pickets, I ran a chalk-line and cut them straight on the front and back.
To finish the roof, I added aluminum drip-edge, roof felt, and regular asphalt shingles. Doing this part reminded me or something I previously realized many years ago: I really, really hate doing roofing work. Luckily this was not a very big roofing project, so I managed to finish it without screaming or smashing anything.

The last step in construction was to add the slat walls. I used fence pickets for this part as well, because they’re light, cheap, and I think they look great. The reason I used an “L” shape for the vertical corner supports was because I wanted to attach the pickets to them in a clean and nice-looking way. I also added an inner wall, splitting the space of my shed into 2 halves. I’m not sure if this was necessary, but I liked the idea of having two separate sections that I could fill up with either different kinds of wood, or wood that was at different stages of seasoning. It also seemed like there would be less chance of a firewood avalanche if there was a supporting wall in the middle.
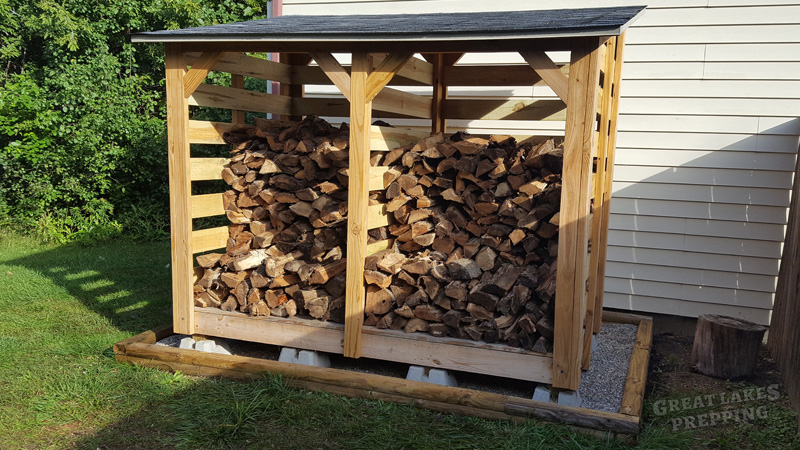
Finally, for the sake of landscaping and just general aesthetics, I decided to frame the whole shed in with landscaping timbers. I laid down weed-control fabric, and filled it over top with pea gravel. I went this route because it would be pretty annoying to get behind and under this thing with a weed-whacker. So I graveled over the whole area, and the frame of landscaping timbers keeps it all contained.
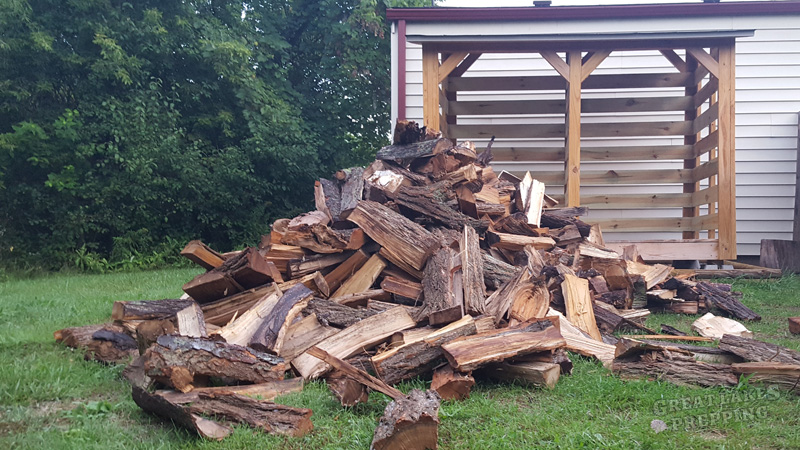
So then all that was left to do is haul over some firewood and start stacking. I brought in 2 face-cords of wood. I’m able to fit the pieces of wood 3-layers deep into the shed. After stacking those 2 face cords, it’s clear that I can still fit at least one more.
A couple final things to mention. I used deck screws for every part of this thing, rather than nails. Every beam, support, slat, and floorboard is attached with hex-bit deck screws. The only nails in this entire thing are roofing nails for the shingles. I could have gone a lot cheaper and a lot faster if I used my framing nailer instead of screws. But I almost always choose screws, because I want this thing to outlast me. Nails work themselves loose. My privacy fence is built with mostly nails, and I see new pickets working themselves loose every year.
Secondly, I did not build this shed on cemented posts, or tamped ground, or with a substrate of sand or gravel. Because of that, and because this is a heavy shed that’s holding thousands of pounds of firewood, I acknowledge that this entire thing could begin to shift or sink over time. It hasn’t budged so far in the couple years since I finished it, but it could. I may end up having to deal with that issue at some point in the future. It would probably involve emptying the shed and re-leveling with spacers of some sort. But that’s a problem I’m not going to think about unless it happens. Because this is but a humble, non-permanent firewood storage rack, the worst that can happen if this begins to sink unevenly is my firewood could fall out. There is nothing especially catastrophic that can happen. The reason I mention any of this is as sort of a disclaimer about building a structure without a proper foundation: Understand the potential problems, and do it at your own risk.
So that’s it. I’m really happy with how it came out, and I would use this design again in the future if the need arises.